How To Manage Xbox Child Account Settings 2022
If you have children and Xbox, it can be trouble if you do not keep a check on your kids’ activity on the Xbox. But you cannot watch over them all the time, right? That is when the Xbox child account settings will come into use. So, it’s time to know how to manage Xbox child account settings.
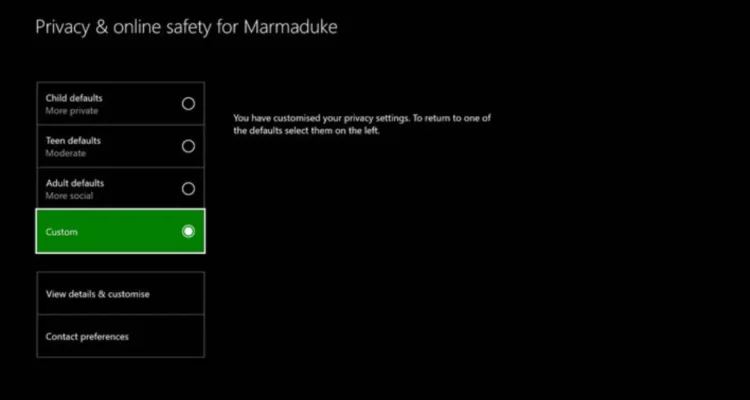
To manage Xbox child account settings, you can visit the Profile & System menu, from where you have to go to the Account settings and then Privacy & Online Safety. Here you can choose your Xbox Privacy for the child account.
As you might know, having an Xbox means access to a wide range of apps including Netflix, Apple TV, Disney +, Amazon Video, Hulu, Pandora, Sling TV, and so on, which makes the content available for the users unlimited. However, this can be a problem if you have kids in your house because there are a lot of things over there that kids are not supposed to watch.
To maintain the safety of the kids, Xbox provides the users with the child account option where the parents can view as well as alter the privacy and safety settings on the Xbox. If you are also up for this, we will explain to you everything you need to know about managing Xbox child account Settings.
How To Manage Xbox Child Account Settings?

If you want to alter the child account settings for Xbox, then here are the steps that you can follow:
1. First, you have to sign in to the Xbox console using your Microsoft (adult’s) account.
2. Then you have to press the Xbox button on the console. This will open the user guide.
3. Here click on the “Profile & System” option.
4. Open the Settings menu and then select “Account” settings.
5. Click on the “Manage family members” option.
6. Here you can now choose the child account that you want to manage.
7. Select the “View details & customize” option.
Now, you can customize the settings that had previously been implemented on your Child’s Xbox account to however you would like.
There are several categories, so you can review all of them provided over there and decide what level of privacy you want for your child’s account.
Also read: How to access Xbox game pass on PC?
How To Change Xbox Child Account Settings To Teen Or Adult?
As your kids grow into teens, there are several changes that you have to expect from their side as well as yours. You can control your kids, but you cannot be that overprotective with teens.
Just like that, if you have had an Xbox child account for your kid, now is the time that you switch the Xbox child account settings to teen, right?
Or you might just want to know how to change Xbox child account to parent. If you are wondering how this is done, then here is our step-wise guide to doing this:
1. First, launch your Xbox, and on your console press the Xbox button.
2. As the User Guide appears on the screen, click on “Profile & System.
3. Go to the Settings menu from here and select Account settings.
4. Now, head to the “Privacy & Online Safety” option.
5. Enter the passkey that you had set in the account.
6. Select the “Xbox privacy” option from the list.
7. Here you will see the Child, Teen, and Adult default options, set to the Child account.
8. You can change the default settings from Child to Teen or Adult by clicking whichever you want to.
If you want to further make the modifications, you can select the “View details &
Customize” and there you can make any kind of customizations you would like to.
Remember that the Adult default settings let the users view anything and everything they want to without any restrictions. So, we suggest you not switch to those settings as long as your kids haven’t grown up to be adults.
Also read: How to fix outdated server on Minecraft 2022?
Wrap Up
We hope that now you clearly know how you can manage your Xbox child account settings, or how to switch the child account to a teen or adult account. So, if you feel that there is a need for change in the privacy and safety settings on your Xbox with respect to your kids, then make the necessary changes in time.
Muskan, has her awesome manner of telling things about herself without bragging too much. Video games have always been a part of her life. She has enjoyed a plethora of console, pc and online games. She is a wizard from the gaming world.


